![]()
![]()
![]()
![]()
![]()
![]()
![]()
![]()
![]()
![]()
![]()
![]()
![]()
![]()
| Review
from January 2003 issue of Model Railroad News • Volume 9, Issue 1 •
The NewsMonthly for Model Railroaders
Garden Metal Models builds Large Scale bridge |
|
| Review
and photos by John Sipple 24 inch Deck Girder Bridge, MSRP: $89.95 Combination Catwalk/Bridge Ties, MSRP: $34.95 Both products together, MSRP: $124.90 |

Try 3 issues free! www.modelrailroadnews.com |
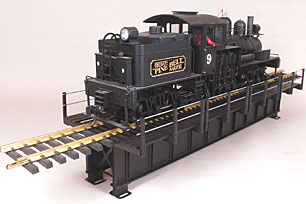 |
Garden Metal Model’s Large Scale 24 inch deck girder bridge comes as an assembled steel structure below, plus a track ties and catwalk kit which is sold separately. Buyers install their own track rail; the review’s author used a three-foot section of Aristo-Craft track, sliding it through the deck ties and using a 6 inch piece of original Aristo ties at either end. Big old Bachmann Shay rests easy on this steel structure which doesn’t flex in any direction under the Shay’s weight. |
| STEVEN
GUGEL
has helped design many of the products you enjoy in model railroading
today, and he’s done it in many scales. His list of clients include
Aristo-Craft and Life-Like, but now he’s jumped into his own business,
making bridges. His first effort is a 24 inch deck girder bridge which
comes fully assembled. It is made of steel, complete with embossed rivets,
and can have a deck with catwalk and railing plus special ties added to
the product. The Bridge I recall reading a letter to the editor of a large scale magazine chastising layout owners for using bridge structures which didn’t look the part. No problem here. This is a four pound steel bridge which arrives completely assembled. While I didn’t actually try it, I believe this bridge could support ME! In keeping with bridges of railroading, it is massively engineered. It isn’t what a bridge can handle once that interests civil engineers; they think of 14 trains a day, weighing thousands of tons each, pounding over their creations for the next twenty years. The main structural, load-bearing element consists of a pair of plate girders. A sheet of steel, stood on edge, has immense weight-bearing potential, so long as we prevent it from suffering both shock and lateral forces. By using two girders and tying them together with diagonal cross members, the lateral forces have been taken care of. To prevent shock crumpling, the girder is divided into panels surrounded by vertical and horizontal ribs. Two versions of this bridge account for many of the railroad bridges across the continent. The first is the common plate girder bridge, and the second is the deck girder. This latter structure places the load on top of the girders to provide the greatest weight-bearing ability for its length. Most girder bridges are fairly short, designed to cross highways, small creeks, gullies and other nominal obstructions to rail traffic. The only drawback to the deck girder bridge is that it consumes more of the clearance beneath the track. The advent of the Bessemer steel process in the later years of the nineteenth century opened the door for structural steel construction. Railroad bridge girders have ranged from five foot tall to around ten with the average girder being 7 to 8 feet tall. The height of the girder would be related to the projected load and overall length. The Model Powder-coated in a durable black finish, this Garden Metal Models bridge enjoys a high degree of detail, right down to the rivets. How much weight you can place on this bridge may have more to do with the pedestals on which it sits than its structure. It sports pedestal shoes which have been constructed to be like those on real bridges. The product does not come with the pedestals; you’ll have to make your own. This is wise because of the incredible diversity of bridge support structures used in prototypical settings. Sold separately, but almost a must, is the catwalk and bridge ties kit. Four tie panels and bridge railing stanchions are molded from UV-resistant plastic. Also included are the steel railings. Each tie/catwalk panel consists of closely-spaced ties with the catwalk molded right in. Three stanchions snap onto each side, a very secure and clever bit of design. The tie plates accept standard Code 332, #1 track. I used a 3 foot section of Aristo-Craft USA-style track because I wanted the extra six inches on each end. The decision to leave the rail to the builder is a good idea. There are many kinds of rail, all in various lengths, and made of brass, stainless steel, nickel-silver and aluminum. This product is prepared for the most common brands on the market. The bottom side of the tie plate sections have a pair of grooves which fit into the top of the girders. There is no specific physical connection beyond that supplied by gravity. Regular Aristo-Craft USA-style track features 14 ties per foot while the bridge tie plates come with 22 ties per foot. This provides a look common to many prototypes. As a Large Scale model, this bridge would be at home on any garden railroad from 1:32 up to 1:20.3. The 24 inch length scales out to 58 feet in 1:29 and a little over 40 feet 7 inches in 1:20.3. As my attached photos should show, it looks great with either of these scales and everything in between. It could also be used as the main span of a shortline turntable. What a thought! Assembly If you don’t stop to take pictures as I did, you could probably assemble the entire tie strip, catwalk with railings, complete with rail in less than an hour. The stanchions snap on and appear to need no glue. The hand rails slide through the stanchion loops. If you wished to model one of the many versions with a catwalk on just one side, you are just some nipper or saw work away from that ideal. You could also model a version without catwalks at all. I used a three-foot length of Aristo-Craft USA-style track and inverted it, removing the tie-rail holder screws. Since my rails are a foot longer than the bridge, I chose to divide the space equally, though you can suit your own layout’s needs. I have seven ties on each side by splitting one of the Aristo tie sections. There are holes in the bridge tie plates which will align with screw holes in the track, but they didn’t line up in the middle when I used the short Aristo strips. However, the Aristo short strips on the end would line up, and so the track was held in place with those screws. Installation Since this was an installation which needed to move right along so that you could read this review in a timely manner, I used a temporary mounting solution, though I intend to pour my own concrete pedestals, complete with mounting bolts molded in. Get out the digging tools, because this bridge does require some leveling and fairly precise placement. Connor Covered Bridge on the Pine Belt failed the last inspection, it being an older wooden structure which was never treated and has spent four hard years out in the weather. It spanned a two-foot draw which drains Dogwood Basin. Since I don’t need a lot of clearance beneath the bridge, a deck girder is just right. Removing the old bridge (it will be given historical preservation) and replacing it with a temporary mounting required about an hour and a half. This allowed me to get photos on the layout and start the process of getting used to the new bridge. When I get time, I plan to make L-shaped pedestals using actual cement. I would like to bolt the main bridge to the pedestals using bolts installed in the mold when it is poured. That way, the bridge and the pedestals will be installed as a single assembly. When I do that, I shall make it the topic of a future “Larger View.” Summary I can’t believe you can buy an actual, heavy-gauge steel bridge like this for under a hundred bucks! Even with the tie strips/catwalk kit thrown in, I’d expect to pay much more than $124.90. In case you’re thinking this is too good to be true, I have the real thing in my garden, holding up track. Meanwhile, I’m hoping Steven’s next project will be a plate girder bridge. I need to replace Victoria Bridge in the next year or so and a plate girder would be just right. Meanwhile, if you’ve got specific questions about measurements and design, please consult Garden Metal Models’ web site; they have mechanical drawings and other useful information to help you. |
|
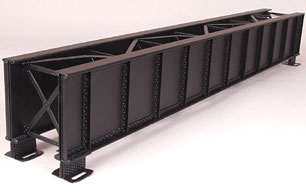 This is the basic bridge. Notice the cross-bracing inside the girders. Those braces make this bridge one tough, authentic gully-spanner. |
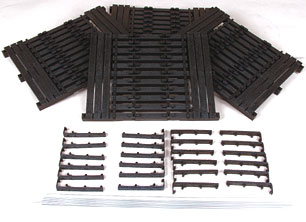 Here are the components of the bridge ties and catwalk railing kit. Each of the four tie panels is 6 inches long and there are six stanchions for each panel. Steel hand rails are below. |
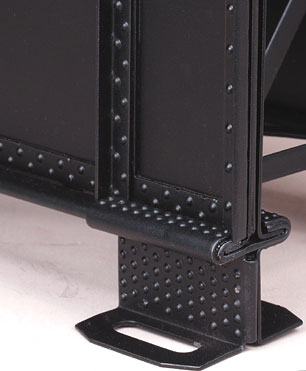 Check out both the detail and the pedestal shoes. As with the prototype, the vertical ribs are additional steel angles, adding strength. |
 A single tie panel with stanchions snapped in place tells much of the story. |
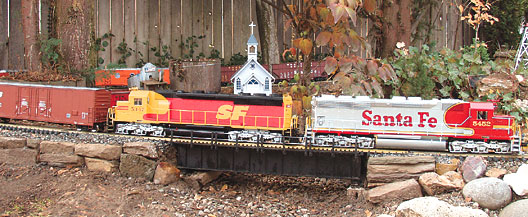
A pair of 14-pound Aristo SD45s leads a train across the new Connor Bridge (named for my grandson, Connor Maxwell Sipple). Condensation on the girders from the morning dew lend some authenticity. Weathering, signs, and fire barrel platforms would further dress up the scene. |
|
| All material in this review is copyright ©2003 by LampLight Publishing and has been used by permission from the publisher. Trademarks, servicemarks, etc., where used, are the property of their respective owners. LampLight Publishing, P.O. Box 1080, Merlin, OR 97532; (541) 955-1096; www.modelrailroadnews.com | |